Here are instructions for getting a Python stack installed on Windows, Mac, and Linux. These examples will use Python 3 (which I recommend as Python 2 is no longer being developed).
You have two main options for installing a Python environment. You can use the Python executable that you can get from the Python website, or you can use the Anaconda distribution. I will show you both. If you are new to Python, only doing "data science" work, or using Windows, I recommend using Anaconda.
Using Anaconda
Anaconda is both a product and a company. The company supports Python data tooling and makes the distribution available as a free product, but also as a supported enterprise paid for product. This page will demo the free option, but I'm assuming that the paid product is similar after install. There are versions for both Python 3.x and Python 2.7. Make sure you use the Python 3.x version.
The Anaconda distribution includes "Python" it just has some extras. It uses its own package system to make it simple to create working Python environments on most platforms. The steps you need to take if you want to use it are:
- Install Anaconda (or Miniconda)
- Create an environment
- Install packages into the environment
Install Anaconda
You have two options for installing Anaconda (the product). The first is to install the whole kitchen sink, which is referred to as the "Anaconda Distribution" a 600MB+ download that includes many common libraries for machine learning, data analysis, and visualization. You can download it here:
The other option is to use Miniconda. This is a smaller download that does not include various libraries but rather lets you download and install them on demand. You can download it here:
(Many of my clients work inside a firewall and should use the Anaconda distribution that is available locally inside of their firewall.)
After you have installed Anaconda or Miniconda, you should have an executable called conda available. Test out that you have it. On UNIX platforms (Mac and Linux) open a terminal (if you are on Mac, you can hit Command-space and then type "Terminal" and hit enter). On Windows, go to the start menu and search for "Conda Prompt". Type into the terminal or command prompt:
conda --version
And it should print out the version, something like conda 4.7.5. If it does not do that, then you did not install Anaconda successfully.
Create an Environment
After you have installed the conda utility, you will need to make an "environment." An environment is a sandboxed installation of Python libraries and utilities. The purpose of an environment is to allow per project library dependencies.
For example, I consult with different clients. If I have multiple clients over the years, they might use different versions of libraries. Say, for example, client A is using Pandas 0.19, client B Pandas 0.25, and client C Pandas 1.0.1. Pandas in generally is pretty good about backward compatibility, but it does have breaking changes. Environments allow me to install specific packages for each client project. When I need to work on client A's work, I activate the environment for that project and have access to Pandas 0.19. When I need to shift to client C, I activate the corresponding environment and have access to Pandas 1.0.1.
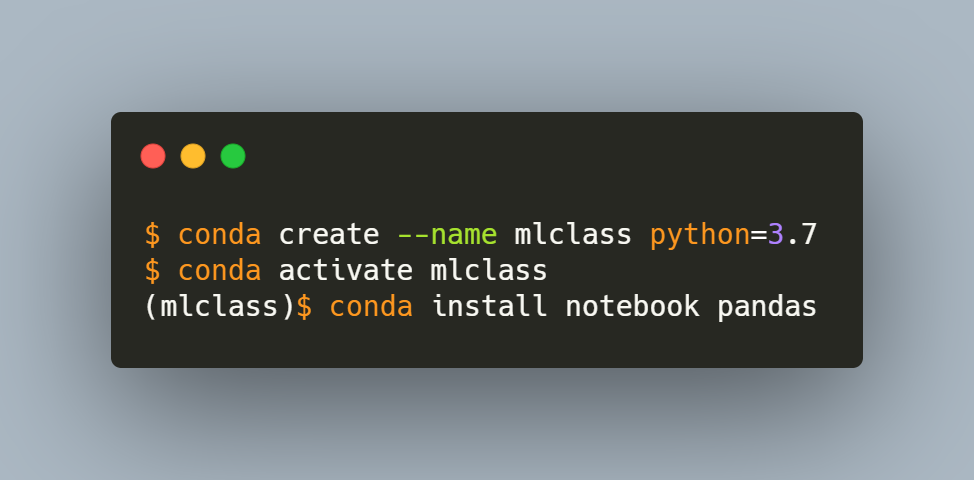
To create an environment, you need to give it a name. For a machine learning class, you might create an environment named mlclass (you can specify another name if you like). You can also specify a Python version for the environment. To create an environment with Python 3.7 from a terminal or Anaconda Prompt (on Windows) type:
conda create --name mlclass python=3.7
You can create as many environments as you like. I create them on a per-project basis. That way, I can jump into a project and make sure that I can work on it without dependency conflicts.
After you create the environment, you should activate it. This updates the PATH environment variable so that when you invoke python or utilities, you use the executables found in the environment. Type:
conda activate mlclass
After running this, your prompt should indicate that you are in the environment, and it will change to look like this:
(mlclass)
Note that Anaconda, by default, stores its environments under your home directory. On my Mac, it would put it in ~/anaconda3/envs/mlclass.
Install Packages with Conda
At this point, you have installed conda, created an environment, and activated the environment. You are now ready to install some packages. Here is a command to install some of the common data analysis packages:
conda install notebook pandas scikit-learn seaborn xlrd districtdatalabs::yellowbrick py-xgboost notebook conda-forge::shap bokeh graphviz
The packages with colons in their names are specified as channel::package name. Anaconda ships with certain packages, but libraries can create their own "channel" to ship different versions of their library (or even package their library for Anaconda) on a different cadence than the Anaconda release cycle.
At this point, you should be ready to go with a basic installation. To launch Jupyter notebook type:
jupyter notebook
To learn more about the conda tool, check out the User Guide.
Installation with Python
Note: If you are using Windows, it is recommended that you use Anaconda rather than this mechanism. Some of the scientific packages require installing and configuring a cross-compilation development environment, which can be annoying. If you are using a Mac and want to follow these instructions, it is recommended to install Python from Homebrew.
Install Python
If you are on Linux, use your package manager to install Python 3.x. On Mac, use Homebrew to install Python 3.x. If these instructions do not make sense to you, scroll up and use the instructions for Anaconda.
After Python is installed, open a terminal and check the version. Type:
python3 --version
It should say something like python 3.7.3. Make sure that you installed Python 3 and not Python 2.
Create a Virtual Environment
Python 3 ships with the ability to create environments that are very similar to Anaconda environments. However, they are not the same. Python calls its environments "Virtual Environments", so I will follow suit here. A virtual environment will allow you to create a sandbox for Python on a per-project basis.
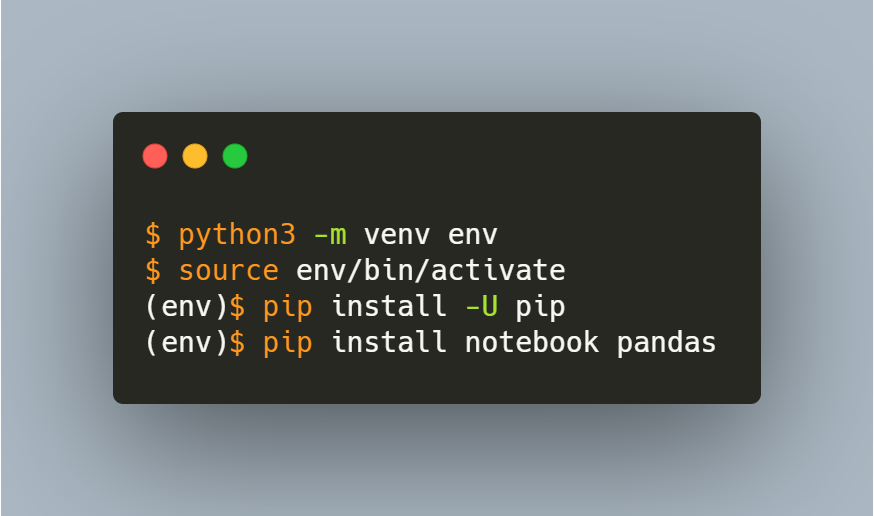
To create a virtual environment named env in the current directory type:
python3 -m venv env
To activate this environment, type:
source env/bin/activate
Note that source is a UNIX Bash command (so this will not work on Windows. If you really want to use Windows, even though I suggested against it with this mechanism, you would type env\Scripts\activate.bat).
At this point, your prompt should change to something like this:
(env)
Install Packages with Pip
With Python installed and your virtual environment activated, you are ready to install packages. We use the pip tool to install packages from the Python Package Index. If your virtual environment is activated, then pip will install libraries into the virtual environment.
You should probably update pip with a new version. Type:
pip install -U pip
To install a base data science system type:
pip install notebook seaborn pandas scikit-learn xlrd yellowbrick xgboost shap bokeh graphviz
To launch Jupyter Notebook type the following:
jupyter notebook
There is a User Guide for pip as well.
Other Options
Can you use Docker? Probably. The above are the simplest ways of getting your environment set up. There may be an existing Docker container you can leverage. But Docker is usually orthogonal to what I'm teaching. Also, the Docker images will probably be using one of the two techniques I described above.
What about hosted services? Google COLAB is a great service (disclaimer: I'm a subscriber to their PRO account), but requires access to Google COLAB, which many of my clients do not have.
Summary
Setting up a Python development environment is three lines of code once you have Python 3 or Anaconda installed. If you have questions about this, feel free to tweet them. I try to keep this page up to date as I point my clients to it.